| Exposure
The interrelationship between
film and light is at the heart of the photographic process.
Everything else is merely an accessory to these two fundamental
elements. How the two react to each other is the most important
thing you must learn to become a good photographer.
Many people assume that film
is film, and that the camera knows what the exposure should
be. They're content to let the photo fall where it may. But
for the serious nature photographer, this isn't an option.
Most of the joy of outdoor photography is in the details of
light and color. The way you control these elements is by
learning what films will bring out colors and what types of
lighting will achieve the mood you're trying for. Understanding
these elements is the foundation for all your future photographic
success. Once you have a grasp of these fundamentals, the
sky is the limit. You'll have the essential tools for making
your individual statement about how you see the world, and
you'll find dozens of ways to manipulate every scene.
PAINTING WITH LIGHT
Light is the medium that you've
chosen to record your creative ideas. A painter uses oil,
acrylic, or watercolor as the medium. For you, the photographer,
light is your paint. Fancy equipment, film, accessories, beautiful
subjects-all are of absolutely no value unless you know how
to control the light that comes into your camera.
Today's cameras are capable
of doing most of the work of finding the correct exposure
setting for a given scene. Modern equipment has become extremely
sophisticated in the way it measures incoming light. But it
would be a mistake to think that you don't need to know anything
about exposure and metering systems. Although the camera uses
a very specific set of rules that work much of the time, they
are by no means perfect.
The camera's exposure meter
is designed to give proper exposure for subjects of middle
tone, the gray tone halfway between light and dark. The
exposure meter chooses the correct exposure for recording
your subject in the midrange between light and dark.
If the scene contains high
contrast, many meters will try to average the light. This
will leave the lighter areas burned out (overexposed) and
the dark areas black (underexposed), a sure way to get an
unsatisfactory photograph.
Some cameras have a spot-metering
system that lets you choose the area of the frame you wish
to have exposed properly. This makes things a little easier,
but you alone should make the final decision on your exposure
setting. Photography is a creative endeavor, and the way you
control the light that strikes your film is the single most
important factor dictating how your final product will look.
Certain lighting conditions
can confuse the camera system; what you want well lit may
not be what the camera is concentrating on, for instance.
So even if you have a camera with automatic exposure (AE) settings, read your manual thoroughly so you understand
how to override these automatic settings. Once you know how
your camera works, adjusting your meter setting to suit your
needs is usually a simple matter. Flaving a fundamental understanding
of the way light works and how your camera measures light
is the key to successful photographs. We'll address your meter
options in more detail in chapter 2.
MEASURING AND CONTROLLING
LIGHT
The light that comes into the
camera is controlled by two settings-shutter speed and aperture.
Each is represented in increments called stops. Each stop
either doubles or halves, depending on which direction you
are adjusting, the amount of light that reaches the film.
Controlling the light that reaches the film is a matter of
combining these two settings to create the effect you wish
to achieve. Each control method provides different attributes,
so understanding them independently will maximize your control
over your images.
This bears repeating: shutter
speed and aperture always work together.
SHUTTER SPEED
Shutter speed measures how
long the shutter will be open to let light reach the film
plane. Most camera shutter speeds begin on the low, slow end
with "B," a symbol that stands for "bulb,"
the squeeze-ball shutter release that was the only option
on early cameras. When your shutter-speed dial is set on "B,"
the shutter will stay open for as long as you hold down the
shutter release. The upper, fast end of the shutter-speed
scale is anywhere from 1/1000 to 1/4000 a second. Shutter
speeds are referred to by only the denominator of the fraction-a
speed of 1/125, for instance, is called 125, and this
is how the speed appears on instruments. Therefore, the higher
the number, the faster the shutter speed, or the smaller the
increment of time that the shutter remains open.
Shutter speed is used to control
how the motion of your subject is recorded-the less time the
shutter is open, the more that the motion is frozen. For example,
if you shoot a running deer at 1/60, he will probably come
out blurred, because you've captured his motion over the course
of 1/60 second. This may not seem like a long time,
but for a quickly moving object it is. But if you shoot the
deer at 1/250, you'll probably succeed in fully stopping
his motion.
Conversely, you can shoot an
absolutely stationary object at as slow a shutter speed as
you wish, if you can control all motion of your camera or
subject. (These objects are very rare in nature photography-there
is virtually always some sort of breeze!)
The most common shutter speeds
that you will find and use on various cameras are I second,
1/2, 1/4, 1/8, 1/15, 1/30, 1/60, 1/125, 1/250, 1/500, 1/1000,
1/2000, and 1/4000.
To understand how the camera
shutter works, open up the back of your camera (without film
in it!). Take the lens off the camera or open the aperture
on the lens to its widest opening, which will be a measurement
such as f1.4 or f2.
Set your shutter-speed dial
at "B" and press the shutter-release button, just
as though you were taking a regular picture. The shutter will
stay open as long as you hold down the button. Now set it
at I second and release the shutter-notice that a full second
seems like a long time. For photographic purposes, it is.
Now work your way through the entire set of shutter speeds
on the dial and watch how quickly the shutter opens and closes.
This will give you a good sense of how much light reaches
the film for each different shutter speed.
As you work from 1 second through
the faster shutter speeds, the time is reduced by half at
each subsequent shutter speed: 1/2 second is half the
time, and half the light, of 1 second, but 1/125 is also half
the time, and half the light, of 1/60 second. The faster
the shutter speed, the less light is allowed onto the film.
Now let's reverse the procedure.
A shutter speed of 1/125 is half as fast, or twice as much
light, as 1/250, 1/30 is half as fast, and twice the
light, as 1/60. The slower the shutter speed, the more
light is allowed to be exposed to the film.
So shutter speed controls the
amount of motion recorded in your photographs. You'll require
shutter speeds of 1/125 and higher to stop motion.
For example, 1/125 may stop the movement of a swimmer,
but catching bicycle racers might require 1/500. Slower
shutter speeds (1/60 and lower), on the other hand, will create
a blurred image if your subject is moving.
Of course, shutter speed isn't
the full story; now we're ready to add aperture setting to
the exposure equation. These two controls always work together.
Aperture
Aperture is the measurement that indicates the size of the lens opening.
This, along with the amount of time that the lens is opened,
determines how much light will reach the film. Aperture settings
are known as f-stops, and are designated by the letter
"f followed by the size of the opening; these settings
are found on the lens itself. Each lens has a different range
of aperture settings based on its speed. (Lens speed is determined
by the largest aperture setting for the lens. Faster lenses
have wider aperture openings, such as fl.2 to fl.8. The largest
aperture opening on slower lenses is f2.8 to f5.6.)
Standard aperture settings
range from fl.4 to f32, but each lens may have a different
range of aperture numbers. The smaller the number, the larger
the lens opening. An fl.4 aperture creates a large opening;
an f32 creates a very small opening.
The most common aperture settings
you'll find on a lens are fl.4, f2, f2.8, f4, f5.6, f8, f11,
fl6, f22, and f32. Each number in the series, working from
the largest opening of fl.4, will transmit half as much light
to the film as the previous number. For example, f2 transmits
half as much light as fl.4, and fl I allows half as much light
as f8 to reach the film.
In reverse, f8 transmits twice
as much light to the film as f11, and fl.4 allows twice as
much light to expose the film as f2.
Play with your lens to see
what we mean. As with shutter speed, an easy way to understand
aperture is to take your lens off the camera. Look through
the rear of the lens and turn the aperture settings from largest
to smallest. Turning the aperture to the largest number, probably
f22 or f32, will create a pinhole opening. Turning it to the
smallest number, fl.4 or f2, will create an opening almost
as large as the entire width of the lens. Every f-stop represents
a halving or doubling of the light you will let into the camera
through this opening. Nearly all 35mm SLR cameras will also
allow you to adjust apertures by1/2-stop increments. These
are the spaces between the "clicks," which allow
you to fine-tune the amount of light for a given exposure.
Some cameras also have a separate exposure-compensation button
that modifies the exposures in 1/3-stop increments.
Aperture controls depth
of field, the amount of the image frame that will be in
sharp focus. A very small aperture opening will create an
image that has most of the frame in focus. In contrast, a
large aperture will have only the central subject in focus-the
background and foreground will be thrown out of focus.
The key to getting the exposure
you want is finding the appropriate combination of aperture
and shutter speed. Though any situation may be shot with a
variety of correct combinations, not every combination will
look the same. A high shutter speed with a large aperture
will capture the motion of a central subject in good detail.
A slow shutter speed with a small aperture will give you excellent
depth of field, and everything in the frame will be in sharp
focus, although any movement will be blurred. Try shooting
different exposure combinations of a subject and see for yourself
the differences in sharpness or depth of field.
LIGHT CONDITIONS
There are a number of conditions
that cause special concerns for the nature photographer.
Bright Sunlight
You'd think that a bright,
bright sunlight creates its
sunny day would be a perfect
time to shoot pictures outdoors. But own special issues. Because
of the way light is reflected, your meter's exposure reading
can be thrown off by bright surfaces such as water or sky,
as well as by dark surfaces such as a deep green forest. That's
why it's handy to learn the Sunny 16 Rule, a quick
way to estimate the correct exposure setting for bright conditions.
Its also a handy backup system if you suspect your meter is
malfunctioning.
Sunny 16 Rule
Shutter Speed = 1/ISO
speed at f16
Using this equation, your aperture
is always set at fl6. If you're shooting with ISO 125 film,
your shutter speed should be set at 1/125 second. You
can round off to the nearest number, as long as it is within
1/3 stop-if you're using ISO 100 film, then, you should get
a good exposure using a shutter speed of 1/125 second.
With the Sunny 16 Rule, always
bracket to ensure that you capture the exposure you want. Bracketing means shooting at 1/2 to I stop under the
recommended exposure, then shooting again at 1/2 to
I over the recommended exposure. Of course, you'll also take
one shot at the exposure you believe is correct.
The Sunny 16 Rule can be the
basis for determining your exposure in a number of conditions.
If your shot is made up primarily of water or snow, stop down
1 to 1 1/2 stops from this setting. If conditions are hazy
with no shadows, open up 1 stop.
High-Contrast Subjects
On some occasions you'll run
into a scene that has virtually every value of light in the
spectrum. Unfortunately, your camera will be able to pick
up only some of the subtleties that your eye can see. Your
job is to choose which values are most important to you and
find the balance that will achieve your purpose.
If the primary area of interest
is in the darker portion of the frame, open up your exposure
setting I or 2 stops above what the camera suggests. Remember
that the brighter portion of the shot may blow out-that
is, all detail will be completely erased.
On the other hand, if this
brighter portion is what you hope to capture, simply stop
down I or 2 stops from the camera's suggested setting. This
will send the darker portion of the frame nearly to black.
Is it possible to have it all?
Often it is, if you're willing to bring a few accessories
along. Reflectors can bounce a little extra light into the
shadowed area. Or you can diffuse or even
block sunlight from hitting
the brighter spots in the shot. Of course, this only applies
to scenes small enough to control. Shots of people and close-ups
can easily be controlled with a few accessories. We'll tell
you more about these accessories in future chapters.
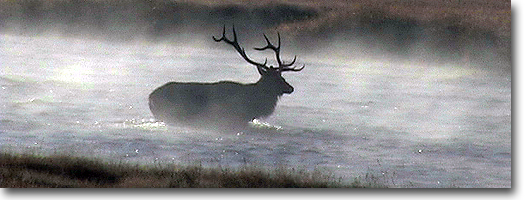
Back Lighting
Backlit subjects can be some of the most frustrating, but also some
of the most potentially rewarding. Light that comes from behind
your main subject accentuates its shape, and this can create
powerful silhouettes. A silhouette is created by exposing
for the lighting behind the subject.
If you prefer to see your main
subject in detail, you'll need to take your meter reading
directly off the subject. If you can approach the subject,
use your camera's meter to determine its proper exposure.
Then step back and shoot using this setting. Try to crop or
remove extremely bright or distracting areas of contrast,
such as a slice of sky.
If you can't approach the subject,
try estimating the exposure. Using the Sunny 16 Rule, you
know the proper exposure for the image. Just open up 1 or
2 stops to get the detail in the main subject.
You may also be able to get
an idea of the proper exposure by using a gray card, a piece of cardboard that is an 18 percent reflectance middle-tone
gray color. Such a card will allow you to find the proper
midtone reading for your light. You can then stop up or down
to adjust for the subject's color.
Sometimes back lighting casts
a beautiful aura around your subject. To capture this rim
lighting, you'll need to find an exposure somewhere between
the bright light and the dark tones of the subject. Try to
meter right to the subject, then open up 1 stop.
As always when experimenting
like this, bracket your images! It's easier and ultimately
less expensive to bracket your photos in the camera than to
try to compensate during the development process.
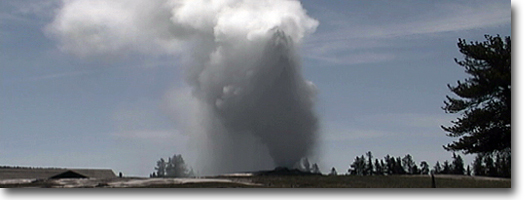
Low Light
The edges of light are the
times of day when many outdoor photographers most actively
search for the magic light. Early morning and late in the
day can be special moments when light sets everything aglow.
These are the times when you can capture the mood and emotion
of the landscape at its finest.
Often, however, the aperture
setting you need to let in the right amount of light won't
match the depth of field you're trying to achieve. Or the
slow shutter speed can't capture the motion you're after.
To complicate matters further, the lighting at dawn and dusk
is ever changing, shifting moment by moment.
To capture these many moods
requires quick thinking or a lot of bracketing or both. Check
your meter reading often. As the sun goes up or down, the
light changes every minute.
If you're shooting the sunrise
or sunset, make certain that the sun is not in your viewfinder
when you take your meter reading. Take your reading off the
sky to either side of the sun, or on grass or foliage nearby
that's a middle tone compared to the surrounding colors.
|